The Kettlebell Towel Swing (instructional video)

At one of the kettlebell boot camp workouts I led this morning at our studio here in Sacramento, CA, we had a new person in the group.

She was fit, and had been working out regularly prior to joining us…

…but she did not have a lot of experience specifically with kettlebells.

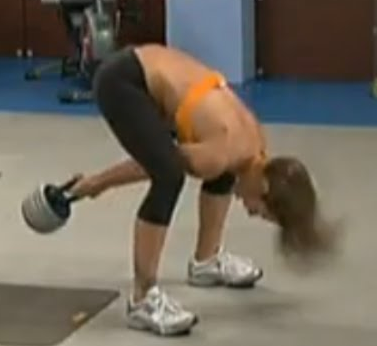
One of the things she was doing was using too much upper body to sort of “lift” the kettlebell up, instead of using the hips.

This is a super common mistake, so I thought it would be useful to share the drill I had her do (which fixed her form right away!):

I am doing an ONLINE kettlebell swing workshop on Saturday, November 14th:

=>> Online KB Swing Workshop with Forest Vance

You can attend live, or sign up and get the recording to watch any time you want.

We will be covering dozens of tips like the one I am sharing with you today.

And, if you attend live, I will look at your form and give you some personalized tips to improve!

The Kettlebell Towel Swing

Grab your towel, and loop it around the handle of your kettlebell.

Be sure to “choke down” on the towel so your hands are just a few inches away from the KB handle.

Do a few swings.

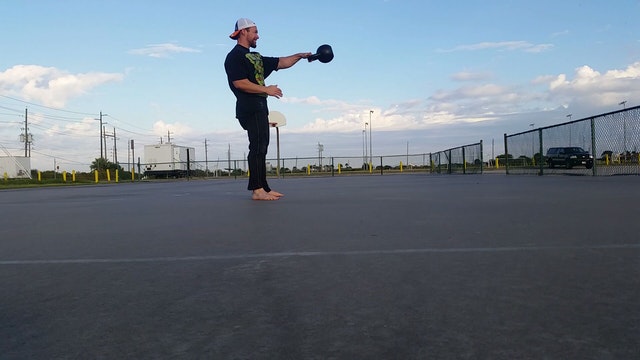
The goal is to get the KB to go straight out, NOT droop down, at the top of the arc.

Here is a video that shows you how to do it:

If you think you have the tendency to use too much upper body when performing the kettlebell swing, try this drill.

Even if you think you’re doing the swing right, try it anyway! 🙂

It’s a good test, because you’ll see right away if the KB is projected out like it should be, or if you’re using too much upper body in the move.

Hope that helps, keep training hard, and talk soon

-Forest Vance
KettlebellBasics.net

PS – I am doing an ONLINE kettlebell swing workshop on Saturday, November 14th:

=>> Online KB Swing Workshop with Forest Vance

You can attend live, or sign up and get the recording to watch any time you want.

We will be covering dozens of tips like the one I am sharing with you today.

And, if you attend live, I will look at your form and give you some personalized tips to improve!

8-Min Morning Home Stretch Routine

Every morning when I get up, one of the first things I do is stretch.

I put on my coffee, and then I go through a simple routine while it brews.

The routine changes and evolves as time goes on, and my needs change…

…the one I am actually personally doing right now is from the 30-day Flexiblity Challenge linked below:

=>> 30-day Flexiblity Challenge

I won’t go into super detail in this article – you can get that in the full program – but what I end up doing looks something like:

  • General joint mobility exercises – hands, elbows, shoulders, neck, hips, knees, ankles
  • 3-5 static / dynamic / “tense-relax” stretches for specific parts of the body that I am working on, or that need specific attention for my goals

This ends up taking around 8 minutes, give or take.

I’ve said this many times before, but this simple morning stretch routine has made a TREMENDOUS difference.

Just that few minutes helps me:

  • Recover faster
  • Get out the “creaks and cracks”
  • Feel more energetic so that I want to move more during the day

The thing is, if you want to continue to train hard and perform as you get into your 40s, 50s, 60s and beyond, you ABSOLUTELY CAN do it… BUT, you have to take care of your body.

Mobility and flexibility as part of your overall plan, is one of those ways you need to be taking care of yourself.

If you are ready to start incorporating this kind of thing into your life, the 30-day Flexiblity Challenge linked below is a great way to do it:

=>> 30-day Flexiblity Challenge

And here’s to faster recovery, less pain, and more energy!

-Forest Vance
KettlebellBasics.net

PS – I started doing this morning home stretching routine seven or eight years ago, in my mid-30s.

Up until that point in life, warming up and stretching was kind of an afterthought.

But when I hit that 35-ish mark, I started getting a little more sore from hard workouts. My recovery started taking a little longer.

And I realized that I COULD still train hard for a long time to come… BUT, I also realized that I was going to have to take a slightly different approach… one of the big things being a need to focus more on flexibility and mobility.

If you know you need to do the same, I recommend the 30-day flexibilty challenge, on sale this week at the link below:

=>> 30-day Flexiblity Challenge

the 10,000 Kettlebell Swing Workout

Have you heard of the “10,000 Kettlebell Swing Workout”?

From my understanding, strength coach Dan John came up with the idea around 2013.

The original idea is to do 500 swings a day, for 20 days.

Between the kettlebell swings, you do a low-volume strength movement such as chin-ups, goblet squats, dips, or overhead presses.

There are more details you need to know if you’re going to try this… but honestly, I think it’s a simple and awesome home training program.

BUT… and there is a BIG but! 🍑

I think where SO many people get this wrong, is they go into something like this, without first knowing how to properly swing a kettlebell.

They rush into it, and don’t get as much out of it as they could be. And maybe even end up injuring themselves.

However, getting proper instruction can be tricky. You don’t know who to trust. We’re in the middle of a pandemic, and a lot of gyms are temporarily, or even permanently, closed.

I have a solution!

I am doing an ONLINE kettlebell swing workshop on Saturday, November 14th:

=>> Online KB Swing Workshop with Forest Vance

You can attend live, or sign up and get the recording to watch any time you want.

I also include my “KB Swing Crash Course” video series AND a copy of my KB Basics Swing Manual – so that you can get started learning right away.

And so if you’re going to try something like the 10,000 Kettlebell Swing Workout – or any other program with a lot (or even a little) of swings… you can be confident that you are doing the move safely and effectively.

To your continued success –

-Forest Vance
Kettlebell Expert
KettlebellBasics.net

PS – We have limited spots for this event. Get details and reserve your spot here now.

[kettlebell hack] Pelvo-Ocular Reflex, or “The Secret is in the Eyes”

Hopefully it goes without saying that the person in the picture above (BTW – it’s a very well known fitness “expert”! – can you guess who it is?) is NOT using proper form 😂

But in all seriousness- where do YOU look when you are performing a kettlebell swing?

As in – are you looking down? Straight ahead? Up?

Believe it or not, your “line of sight” is one of the KEYS to safe and effective kettlebell training.

BTW – Pelvo-Ocular Reflex, or “The Secret is in the Eyes”, is is what I call one of my “kettlebell hacks” – DOZENS of which you’ll learn in our upcoming kettlebell swing workshop:

=>> Online Kettlebell Swing Workshop with Forest Vance

See, there is something called the “pelvo occular reflex”.

In short, here’s how it works:

Visual sensory input (where our eyes are focused) involuntarily affects our head placement.

Likewise, the placement of our heads affects our pelvic placement, lower back alignment and overall posture.

So if you look down during a kettlebell swing, your body tends to pitch forward, putting extra stress on your back and making the move much harder.

If you look up, you end up typically overextending the lower back, and putting extra stress on the neck.

The perfect place to look is slightly down – we like to use the cue “where the wall meets the floor”.

Little tips like this one can make ALL the difference when it comes to getting the most out of your KB workouts, and staying safe.

This is what I call one of my “kettlebell hacks” – DOZENS of which you’ll learn in my kettlebell swing workshop:

==> KB Swing Workshop with Forest (limited spots available)

Space is limited to the first 100 to sign up though, so sign up now if you want to make sure and get in.

To your continued success!

-Forest Vance
SFG II
Kettlebell Expert
KettlebellBasics.net

Online Kettlebell Swing Workshop – Saturday, Nov 14th

Online Kettlebell Swing Workshop – Saturday, Nov 14th

Details and sign up here: http://bit.ly/onlinekbworkshop

I GUARANTEE you will learn something new, or I’ll give you your money back!

Plus, you get my “HardStyle Swing Crash Course” video series AND a copy of the KB Basics Swing Manual FREE when you reserve your spot.

But space is limited to the 1st 100 to sign up.

Details and sign up here: http://bit.ly/onlinekbworkshop

Look forward to seeing ya there!

-Forest and the FVT Team

20.20 Election Day Kettlebell Circuit

Here is a special kettlebell circuit you can do on this Election day.

Set your timer for 20 minutes and 20 seconds; get as many rounds you can of:

Version 1 (beginner)

11 inverted rows
3 burpees
20 two hand kettlebell swings

Version 2 (intermediate/advanced)

11 burpees
3 pull ups
20 one hand kettlebell swings (10 per side)

Have fun with that one.

And, get out there and vote!  

– Forest and the FVT Team

PS – Want to perfect your kettlebell swing form? Would you like to get access to a kettlebell – based training plan to help you burn fat faster and send your conditioning levels through the roof? If so, we have a top-secret project in the works that you are going to LOVE. Details coming very soon, stay tuned!…

[new vid] How to Avoid Bruised Wrists from Kettlebell Training

Do you get bruised wrists from your kettlebell workouts?

Today, I’m going to show you how to fix it!

One of the common exercises this happens with is the kettlebell clean. Two tips that are going to help:

1 – “Tame the Arc”

When the KB comes down, we want the “arc” that the ‘bell takes to be close to the body. If the kettlebell comes too far away from your body during the move, and then comes up and slams you in the arm as it flips around, you’re going to end up with bruised wrists. Instead, keep your elbow tight to the frame as you do your cleans.

2 – Lose the “Death Grip”

Another thing people do – in an effort to keep the KB from coming around and slamming the wrist – is to squeeze the KB really hard as it flips around the hand. Instead, what you want to think about is taking a loose grip, and then “punching” the hand through as it comes around the wrist.

#

There are two tips to help you from getting bruised wrists from kettlebells!

If you liked this video, check out my 7-day extreme KB cardio quick start guide free at the link below, so that you can put some of these tips to use:

https://bit.ly/311ceyA

And talk soon!

– Forest Vance, Kettlebell Expert, KettlebellBasics.net