7 Minute Kettlebell Cardio Workout

Got another high-intensity, metabolic-style, fat-accelerating workout for you today.  All you’ll need for this one is a single kettlebell and your own body weight.  Even better, it’ll jack up your metabolism so you’ll be burning fat for hours after you’re done.  Check it out:

7 Minute Kettlebell Cardio Workout

(video recap)

Perform exercises back-to-back without rest; rest :60; perform sequence two more times for a total of three sets per exercise.
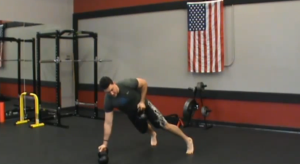
10 Sumo Jumps

This exercise is like a KB sumo deadlift; you’ll simply jump with the weight at the top of the movement to finish it. Make sure to keep the upper body locked in throughout the exercise.


10 Push-Ups

The basic version of the Push-Up is performed from the toes. Starting from the ground, our body is nice and straight, our chest, hips and thighs all should be in the same plane. Our shoulders are pushed down and back, our abs are engaged, and our flutes squeezed.

10 Goblet Squats

To perform the Squat, start with your feet between hip and shoulder width apart, toes pointed straight ahead or slightly out. Weight is back through the heels, chest is tall, and shoulder blades are pushed down and back. Sit back as if you’re sitting in a chair. The lower leg should stay completely vertical. Imagine that you are stuck in cement up to your knees.

10 V-Ups

Begin in a lying position. Perform a straight leg sit-up, initiating the movement by pressing your back into the ground. When you’re about halfway up, tuck your knees to your chest. Lower yourself back to the floor and repeat for reps.


15 High Knees + 15 Butt Kicks

Run in place, bringing your knees as high as possible with each rep during the high knees, and kick the butt with the heels during the butt kicks.

 Kettlebell and Body Weight Gasser

The workout above is a sample from my 4 week Kettlebell and Body Weight Gasser program.


In it, you’ll find a full four week kettlebell and body weight – based program to help you burn maximum fat and build lean muscle … all with just a single kettlebell and your own body weight.  AND the workouts are short and efficient so you’ll get maximum results from minimum time investment.

Right now you can get this program FREE.

How? Just click THIS LINK … check out all the details on my friend Kate’s Fat Loss Accelerators program (on sale this week), see if it is a good fit for you … and when you grab your copy, I’ll send you a free copy of MY new program, “Kettlebell and Body Weight Gasser”.

No need to forward your receipt or anything … Kate is going to send me a list of folks who purchase the program through me and I’ll send you a copy of KB + BW Gasser once the sale is over.

That’s it for today! Thanks for reading, enjoy your weekend, and talk soon –

Forest Vance, MS, RKC

MY “Off-Day” Recovery/Flexibility/Mobility Routine

I am training for another RKC II cert which is coming in about 6 weeks. Among the things I need to do include a windmill with a snatch size ‘bell and a perfect ass-to-grass pistol squat.

Now I can grind out both of those right now … but I will not lie, my flexibility in the hips and thoracic spine areas leaves something to be desired. I might be able to DO the movements but they aren’t as great looking or honestly as good as they could be. That’s why I am dedicating a full three days per week of workout sessions JUST to recovery, flexibility and mobility. Already after just three sessions of this last week, I could feel the difference in my windmills and pistol squats in yesterday’s training session. Pretty crazy.

Now if you know you need to work on your flexibility and mobility (and chances are you do), you should try this method as well. Here is what one of my recovery/flexibility/mobility days looks like if you want to try and build it into your own routine:


MY “Off-Day” Recovery/Flexibility/Mobility Routine

1 – Foam roll/SMR

I take a lacrosse ball and roll out sore areas in my upper back, standing against the wall. Then I use the foam roll to hit my calves, hamstrings, IT bands, quads, hip flexors, and back.

2 – Joint mobility

I do 10-20 reps each of:

3 way neck
shoulder shrug
arm circles
hip circles
knee circles
ankle circles

3 – Dynamic stretch

I’ll hit specific areas I need work on – inchworms for the hams and calves, sumo squat-to-stands for the hips, walking lunges w a reach for the hip again …

4 – Low intensity walk or bike ride for 20 or 30 mins

I enjoy getting outside and doing this, it enhances recovery, I work the cardio a bit and I can get out in nature and clear my mind. And since I typically train

around noon it’s also a nice break from all the craziness of a typical day.

5 – Static stretch

Here I will again hit areas I need to focus on – like the hips, hamstrings, T-spine, etc. Also I will include a couple of yoga poses here.


If you need to loosen up and enhance your recovery, try working a session or two like this per week into the mix, and let me know how it goes for you. I think you will be pleasantly surprised 🙂

Enjoy the rest of your weekend, and talk soon –

– FV


PS – My PreHab revolution program is on sale for the next couple of days. In it you will find a full program to get you feeling and moving great. It’s got follow along videos on how to perform everything outlined above and a LOT more included. Check it out here:

=> PreHab Revolution

Simple Early AM/Pre-KB Workout Joint Mobility Routine

As you probably know, I had a “cup of coffee” in the NFL in a previous life, with short stints on a couple of different teams.

Leading up to that point, I had been involved in competitive sports for over 15 years.

Long story short, my athletic career left me with my fair share of dings. I got off pretty good compared to a lot of guys I know, but I still feel it on a daily basis.

So, I’ve been doing a simple, five minute joint mobility routine nearly every morning for the last six months or so. This little thing has probably had more impact on my overall health and well being than anything else I have done this year. It’s been a HUGE help in reducing some of my chronic aches and pains.

Today, I have a SUPER simple joint mobility routine to get you started – so you can start enjoying the benefits of joint mobility training as well!


Simple Joint Mobility Routine

The simple definition of joint mobility training: Actively moving the joints through a full range of motion, with the intent of restoring or maintaining mobility.

Joint mobility training is important for several reasons:

  • It improves performance by helping you learn how to properly engage each joint and muscle group in your movements.
  • It increases the efficiency of your movement.
  • It drastically decreases the chance of injury by elimiating incorrect movements along incorrect joints.

Exercises

-Do 10-20 reps of each exercise
-Make you you set yourself up with perfect posture BEFORE you start the routine.

  • 3 way neck
  • shoulder shrug
  • arm circles
  • hip circles
  • knee circles
  • ankle circles

Try this simple joint mobility routine today and see the difference for yourself!

Click HERE to see a video showing how to do all of the movements and to see my full “PreHab Warm Up” routine (includes foam rolling, dynamic stretch and more)

Thanks for reading, and talk soon –

Forest Vance
Master of Science, Human Movement
Certified Corrective Exercise Specialist

The BEST Kettlebell Exercise for Abs?

No matter WHERE your fitness level is at …

You can always get better abs.

Thing is … traditional ab training … crunches, leg raises, sit ups, etc. … not only is it ineffective … it’s boring.

A fun and unique kettlebell exercise for abs is the kettlebell renegade row. And as an added benefit, when you do this move, not only will you work the heck out of those core muscles, you’ll hit almost every other muscle group in your body at the same time.


The Kettlebell Renegade Row

The way that your abs and your whole core (which includes your glutes, your midsection, your lower back and those muscles in the middle of your back) functions is as a stabilizer.

Say for example, if I’m doing a kettlebell swing or I’m doing a goblet squat, my abs are tightening up to stabilize my trunk during functional movements.

So here is an exercise called the renegade row. This is a unique exercise, you may have see it before, but it is a great total body ab movement.

Grab two kettlebells. The basic version has you practicing shifting your weight back and forth. Shift your full weight to one side while keeping your abs tightened like you are doing a push up.  This is SUPER helpful to get the proper weight distribution of the movement down.

Then you can go ahead and add a row to it.  The move should now be exactly the same, except you’re actually doing a row.

If you want to make it more difficult, you can add a push up between each row.

Also important to note, my abs are bracing really hard to stabilize as I shift my weight and do a row on one side.

This is a total body exercise with a strong emphasis on the abs. There’s the kettlebell renegade row – a great exercise for abs!


Here is a YouTube video on how to do the exercise:


Kettlebell Renegade Row Workout

Now you know how to properly perform the renegade row … here’s a quick workout you can do with it.

Set your timer. Do three Renegade Rows every 45 seconds. Do a push up after each row while you’re on the ‘bells – so you’ll end up doing six push ups and three rows each side.

Your rest is the remaining time in the 45 seconds you have AFTER you’ve done your reps. (The faster you go, the more rest you get.)

Do this a total of five to ten times – depending on fitness level, goal, etc.


Total Body Abdominal Annihilation

And also, to remind you … I just finished putting together a new program, called “Total Body Abdominal Annihilation”.

In it, you’ll find:

– More of my favorite total body kettlebell and body weight exercises – like Janda Sit Ups, Windmills, and TGUs
– Simple to do yet SUPER effective total body ab workouts like this one in this article
– And more ..

Right now you can get this program FREE.

How? Just click THIS LINK … check out all the details on my trusted friend Dennis’ Superhero Abs program (on sale this weekend), see if it is a good fit for you … and when you grab your copy, I’ll send you a free copy of MY new program, “Total Body Abdominal Annihilation”.

No need to forward your receipt or anything … Dennis is going to send me a list of folks who purchase the program through me and I’ll send you a copy of TBAA at the beginning of next week.

That’s it for today! Thanks for reading, enjoy your weekend, and talk soon –

Forest Vance, MS, RKC

Two Quick Drills to Fix Your Kettlebell Swing Form

Just finished up a great group kettlebell workout this morning at the studio.  At today’s session, we worked on our swing form quite a bit.  A point that got brought up today regarding the kettlebell swing was great, and I wanted to share it with you.

When it comes to the kettlebell swing, our number one goal is to get you to a place where you can do the movement safely and effectively. We don’t want you to get injured doing the exercise, and we want you to be able to enjoy all the benefits it offers – like fat loss, improved conditioning, etc.

That’s our baseline. We try to get folks to that point as soon as possible. And for most people it takes 3-5 training sessions, maybe 300-500 reps of the swing, WITH expert supervision and coaching, to get there.

This should be your goal as well.

Then, after that, we are ALWAYS going to be tweaking and refining the exercise. You can always get a little better at swings. And you should always be trying.

All this being said, I have two drills for you today that will help you improve your swing form, no matter where you are currently at with it. Give them a go, and be sure to let me know how you do:


1 – Face the Wall Squat Drill

Wall squats are the perfect way to teach someone how to squat correctly. The wall squat drill is performed while facing a wall and standing approximately one foot away. You will squat down as far as you can, without any part of your body coming in contact with the wall. The visual reference of the wall forces you to stay tall and upright as you squat down. You will also want to make sure your knees track over your toes and you keep your torso in a neutral or straight position. As you get better, and your hips and upper back become more mobile, you will be able to squat lower and lower.

Check out this video to see how to do the exercise:


2 – The Plank => KB Swing Drill

A proper kettlebell swing requires you to brace your abs just like a plank does at the top of the movement.

If you are NOT bracing your abs properly, you can 1) do a plank hold, and then 2) do a few swings immediately afterwards to feel the relationship between the two.

Check out this video to see how to do the drill:


To sum up, the kettlebell swing is one of the most efficient exercises ever. You’ll burn an amazing amount of fat with it in a short amount of time, and your conditioning levels will go through the roof. BUT – you can also ALWAYS be improving your KB swing form. The two videos today will help you a lot in doing this.

That’s it for now. Try today’s drills and let me know how they work out for you.

– Forest Vance
Master of Science, Human Movement
Certified Russian Kettlebell Challenge Instructor


PS – If you enjoyed today’s article and videos, please share it with a friend, family member or co-worker who could benefit from it as well!!

How to Pack The Shoulder for Strength and Stability

Shoulder packing stabilizes your shoulder, reducing the risk of injury. It also enables you to lift more weight.

See, the shoulder joint is highly mobile. But unfortunately, this mobility comes at the price of reduced stability.

What happens is, the top part of the upper arm bone can move away from the opposing joint surface when you, say, reach for something that’s far away from you. The muscles surrounding this joint become weaker as the space inside this joint increases. This separation in the shoulder joint reduces muscle activation, increases the instability of the joint, and increases the risk of injury.

SO … when you press or snatch or Turkish get up a kettlebell into an overhead position, the arm moves away from the body and the muscles that work to separate the shoulder joint are encouraged to fire.

What is the fix?

You will be stronger and press more safely if you can connect the upper arm to the opposing joint surface or “pack” the shoulder.

If you don’t know how to do this already, here is how in two easy steps:

One – learn how it feels to pack the shoulder. Watch the video below to see a drill that will show you how:

Two – reproduce and practice that feeling during a KB exercise (right after you try the shoulder packing drill). Grab a light kettlebell and press it overhead and try to keep your shoulder packed.

That’s it! Hopefully you now know (if you didn’t already) the value of packing the shoulder … and you have a new handy drill to practice it.

Let me know how that works for you, and talk soon –

– Forest


PS – If you enjoyed this article and video, please share it with a friend, family member, or co-worker who might enjoy it as well!