Is Your Kettlebell Clean Jacked Up? Here’s How to Fix It!

The Kettlebell Clean is a really tricky move to master.  It looks simple when you see someone perform the movement properly – on video, for example – but then when you go to try it yourself, you many times simply end up frustrated and/or with a bruised forearm 😉

Check out the video below for a quick drill you can do to improve your kettlebell clean form:


Is Your Kettlebell Clean Jacked Up?  Here’s How to Fix It!

(video recap)

We were doing some kettlebell cleans in our boot camp this morning and people were having some problems with them. A lot of people were having similar issues so I thought I’d show you a quick video to break down some common errors with the kettlebell clean. Also, I’ll show you two quick drills that are very effective to fix it.

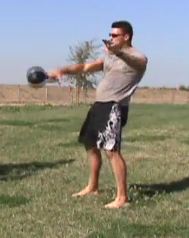
Here is the error that I’m talking about that happens for a lot of people. The ‘bell gets too far out in front or too far out to the side. This arm detaches from the body and the ‘bell ends up coming over the top and whacking you in the wrist.

(Forest demonstrates) That is what a proper clean should look like. Here’s what happens. (Forest demonstrates a bad clean) You get a lot of impact, maybe even more than that. You can get a bruised wrist which is really painful and it ends up being a problem over time.

So to fix that I’ve got two drills for you. For the first drill, get close to a wall, about six inches away or so. Grab your kettlebell and practice your cleans. This will keep your arm close to your body and keep the kettlebell close to the frame. You have no choice or the ‘bell will go through the wall.

The second drill will have you face the wall. This will help you keep the kettlebell closer into your frame. Get as close as you can without whacking into the wall.

Then go back and do your cleans and a lot of times instantly your form will be cleaned up. It won’t be going to the side and the ‘bell will automatically be closer to your body. Then you’re doing a more efficient and less painful kettlebell clean.


The KB clean is a tricky one.  But many times, the simple drill shown in the video above goes a long way towards fixing several of the common problems with the movement.  It’s a great drill to use for 1) learning the exercise yourself and 2) for teaching and re-inforcing great technique with others.

Thanks for reading, train hard, and talk soon –

Forest Vance, MS, RKC

PS – The KB clean is typically paired with other moves – like the press.  Make sure to watch THIS video on fixing your kettlebell press if you haven’t yet for some additional tips that go along well with the ones in today’s video.  Thanks!

PPS – If you liked this video, be sure to pass it along to your kettlebell enthusiast friends and help spread the word! 😉

The Kettlebell Arm Bar

When folks are looking to improve their shoulder mobility, one of the first exercises I recommend – in most cases – is the kettlebell arm bar.

It’s a relatively unknown exercise, but it is awesome.

The arm bar is great for:

– improving flexibility and mobility through shoulder
– increasing flexibility and mobility through the thorasic spine

And much more.

Check out the video below from Mike Robertson of robertsontrainingsystems.com for a quick demo:

If you’re looking to improve your mobility and flexibility through the shoulder, thorasic spine, and much more, incorporate the kettlebell arm bar into your training today!

Forest Vance
Certified Russian Kettlebell Instructor

PS – Questions? Thoughts? Leave ’em in the comments section below!!

Is Your Kettlebell Press Jacked Up? Here’s How to Fix It!

The kettlebell press is an AWESOME move.  It’s fantastic for building upper body strength.  And pressing a heavy object over your head rates right up there with the most “functional”, real-life-applicable exercises you can do.

HOWEVER – it’s also a tricky one to master.  There are a lot more “moving parts” to it, if you will, than you may think.

The problem with the press I cover in today’s video is SUPER common … but fortunately, relatively easy to fix, IF you know how.

Watch today’s video, try the drill for yourself, and see if you don’t improve your KB press!!


*Also … if you find this video helpful … I got a special surprise for you at the end.  If you like the video, you’re going to really dig this.  So don’t miss it 😉


Is Your Kettlebell Press Jacked Up?  Here’s How to Fix It!

(video recap)

Today I’m going to give you a tip that will instantly improve your kettlebell press.

One very common error that people make when they do a press is they don’t keep their forearm straight up and down through the movement. What it should look like is that my elbow is stacked right underneath my hand throughout the whole exercise.

What a lot of people will do is try to rack the ‘bell like this (demonstrates) and they go and do the press and that is not how you want to do it. You’ll be out of alignment and not be in your optimum pressing position.

So a quick fix is something called a bottoms up press.

Clean the ‘bell up and get into your bottoms up position. You’re going to use a lighter ‘bell than usual since it takes a lot of grip strength. Now I can keep my elbow tucked into my side and it will force me to have my elbow underneath my hand.

For this one you want to look at the ‘bell the whole time and use your tension technique and your power breathing. Do a couple presses. Now I’m forced to have my elbow stacked underneath my hand.

Now I’m going to go back and do my regular press and I’ll automatically be in the same exact position and it is going to be much stronger and much more advantageous pressing position.

So if you want to boost your press or if you are having problems getting a hang of the movement try doing that bottoms up press drill. Then you can go back to your regular press and you’ll see an improvement right away.

###

Thanks for reading/watching, train hard, and talk soon –

Forest


PS – Okay for the special surprise 🙂

I’ve recently dug up/refreshed for 2013 one of my “classic” programs from the vault, ‘No Gym? No Excuse! Dumbbell Complexes for Fat Loss’.

It’s a full 12 week program that shows you how to use dumbbell complexes for rapid fat loss and extreme conditioning.   The workouts in it are killer and pretty darn unique, if I do say so myself 😉 …

Thing is, we pulled it off the market about two years ago for various reasons … so I “spruced it up” and updated it for 2013, and now I’m making it available – for FREE – when you try at least one month of my FVT Coaching Club program.

=> Get your FREE Copy of No Gym? No Excuse Dumbbell Complexes for Fat Loss by clicking here

So you’ll get 12 FVT – style KB/BW workouts, PLUS No Gym? No Excuse! DB Complexes for Fat Loss – for less than 10 bucks!  Holy moly!! 😉

(I wasn’t going to announce this offer until Friday, but it’s up and ready to rock, and so for a “special reward” to folks like yourself who’ve read all the way to the end of this post – YOU get first crack at it!!)

 => Grab the deal here

Beginner/Intermediate Kettlebell Swing Form Tip + ‘Quick Fix’ (video)

In the video below, I cover a common kettlebell swing form mistake.

This mistake is typically made by beginner and intermediate KB trainees – but you might even be doing it if you’re “more advanced”.

It’s actually the cause of many unnecessary problems that CAN stem from the KB swing – but SHOULDN’T – including lower back pain.

Watch the video below to see what it is – and your ‘quick fix’ for it:


Beginner/Intermediate Kettlebell Swing Form Tip + ‘Quick Fix’

Thanks for watching, and talk soon –

Forest

PS – Having trouble viewing the video in your browser?  Click the link below:

=> Kettlebell Swing Form video

(Video Recap)

I’ve got a quick tip for you today to improve your kettlebell swing form. 

This is a fix to a mistake that I see all the time in our kettlebell boot camps and with my personal training clients.

First, let me show you what a proper kettlebell swing should look like. 

You can see that I’m swinging the ‘bell back and it is coming above my knee level. What you want to avoid is swinging the weight too low to the ground and going below the knees. 

I get the ‘bell tight to the frame and as close to my body as I can. Get the hips out of the way at the last minute. 

You only make the mistake once of swinging it too high and hitting yourself 🙂

This will make for a much tighter arc and makes for more efficient movement. It’ll also take the pressure off your lower back which is probably the #1 cause of back pain when doing kettlebell swings…….which you shouldn’t be getting, by the way!

How to Master the Kettlebell Snatch

Thanks again SO much for the great feedback on yesterday’s request.  I will be working hard in the coming days and weeks to cover the topics you want to know more about and help you get the results you desire!

One of the top requested topics was how to perform the kettlebell snatch correctly.  So, that is the topic of today’s article.  I hope it helps –


Mastering the Kettlebell Snatch

The snatch is one of the best exercises around for building world-class conditioning with kettlebells. However, learning and mastering proper technique in this exercise can be very tricky.

By breaking the movement down into three steps, we can drastically cut the learning curve and help you learn how to do the movement efficiently and effectively in as fast a time as humanly possible!


Here are the three main elements of mastering the kettlebell snatch:

1. The Lockout

You’ll start with a kettlebell between the feet in a sumo deadlift position. Cheat curl the ‘bell up to your shoulder and press it up over your head.  All we’re trying to do is get comfortable with our overhead lockout position.

The bicep should be right by the ear. A common mistake is to hold the ‘bell slightly in front of the body. If you lack proper shoulder mobility, this is likely going to be a problem for you (all the more reason to practice your Turkish getups).

A great drill to practice and get comfortable in this lockout position is an overhead walk. To perform this drill, you would simply get the KB pressed over your head and walk around the room with it. If your elbow is bent, or the kettlebell is out in front of you too far, this is nearly impossible – and that this drill is very self-correcting is part of the beauty of it.


For a complete breakdown of how to do the kettlebell snatch – with pictures, video illustration, etc. – check out the new-and-improved-for-2013 KettlebellBasics.net Quick Start Guide HERE


2. The Downswing

To start the downswing phase of the snatch, from your overhead lockout position, think about closing the distance from the elbow to the rib cage as fast as possible to bring the kettlebell down.

The arc of the snatch is much closer to the body than the arc of the swing.

Another good coaching point for this part of the snatch is to think about throwing the kettlebell through the stomach.

If you were to take a snapshot of the kettlebell at the bottom position, it would look identical a one arm swing (another reason why it’s so important that you master the HardStyle swing before moving on to more advanced drills like the snatch).


3. The Upswing

We’ve now progressed to performing a full kettlebell snatch. We’ll start with the ‘bell about one foot in front of us (the same set up as a swing).

To start the move, hike pass the weight back – again, the same ‘start’ as the swing. But, instead of swinging the weight in front of you and up to shoulder height, we’re going to go straight overhead with the move into a snatch.


Remember:

The arc of snatch is much closer to the body than the swing. And so to drill this idea down, we’ll perform the following progression:

  • Three one-hand swings.
  • Three high pulls – try to make the ‘bell ‘float’ at the top by pulling the elbow back and snapping the hips simultaneously.
  • Three snatches. The snatch will simply be an extension of the high pull. The weight floats at the top during the high pull, and then we get our hand around the ‘bell to finish the snatch.

In summary, the kettlebell snatch is a somewhat difficult exercise to master technique-wise, but it’s well worth it considering the benefits it provides. Use the three steps outlined in this article to fast track your learning curve in learning the kettlebell snatch!

Train hard, and talk soon –

Forest Vance, MS, RKC II

PS – For a complete breakdown of how to do the kettlebell snatch – with pictures, video illustration, etc. – check out the new-and-improved-for-2013 KettlebellBasics.net Quick Start Guide HERE


Top 13 Kettlebell Training Mistakes and How to Fix Them (part 2)

If you are:

  • Having trouble with the Turkish get up
  • Are whacking the heck out of your forearms on the clean
  • Can’t seem to refine your snatching technique

Today’s post is going to be super helpful for you.

This week, we’re covering the top 13 kettlebell training mistakes – and how to fix them.  If you missed part 1 of the series, make sure that you check that out as well, here:

=> Top 13 Kettlebell Training Mistakes and How to Fix Them


Let’s get right to it!


Top 13 Kettlebell Training Mistakes and How to Fix Them (part 2)


Mistake #6 – Not Doing the Turkish Get Up

I get emails at least weekly from folks asking if they can “skip” this exercise, and do something else instead.  And my standard response is that if you are not doing Turkish get ups, you are missing out big time.

See, the first time I tried this movement, I’m not going to lie – I hated it.  It kind of hurt my shoulders, I couldn’t really figure out what it was doing, and it just felt strange.  I actually was ready to give up on it.

BUT – when I finally got with an RKC instructor and learned how to do it PROPERLY, I realized just how many benefits the exercise provides.  It’s great for shoulder mobility AND stability, “core” strength, hip mobility and stability, and so much more …

Check out this article to see how to do the exercise, broken down into steps:

=> Turkish Get Up Broken Down Into Steps


Mistakes #7, #8, & #9 – (fixing the clean)

The clean is another one of the core kettlebell training moves that can be very tricky to get down.  I have three big mistakes – and fixes – that you’ll find in the video and article below:

=> Three Tips to Improve Your Kettlebell Clean

=> Three Tips to Improve Your Kettlebell Clean (video)


Mistake #10 – No tension generation in the press

If you’re trying to press heavy and you’re not using max tension techniques to help you, you’re missing out big time.

Here’s some tips to help:

=> Boost Your KB Pressing Power

=> Boost Your KB Pressing Power, re-visited 


Mistakes #11, #12, & #13 – (fixing the snatch)

The KB snatch is another really tricky one to get down.

The biggest issues folks seem to have with this one:

  • The KB coming over the top of the hand and smacking the wrist
  • Not generating enough hip drive to get the KB around at the top
  • Letting the ‘bell get too far out and away from the body on the way up and on the way down

Here is my best article and video series on how to do the movement right.  Use this learning progression and these mistakes should be much improved.

=> Mastering The Kettlebell Snatch (part 1)

=> Mastering The Kettlebell Snatch (part 2)

=> Mastering The Kettlebell Snatch (part 3)


Alright!  Between the two posts in this series, I’ve covered what I feel are the top 13 kettlebell training mistakes – and how to fix them.  I am confident that whether you’re a KB beginner or have been at it for a while, you’ll have found some value and new info.    Most importantly, take the tips you’ve learned here, APPLY them in your KB practice, and watch your results go through the roof!!

’till next time –

Forest Vance, MS, RKC II

PS – If you enjoyed this article, be sure to sign up for my email newsletter and grab your FREE Beginner’s Guide to Kettlebell Training!  Just drop your best email address into the box at the upper right of the page to get it now.

And – if you know someone who might enjoy this info – please don’t hesitate to pass it along :)

Top 13 Kettlebell Training Mistakes and How To Fix Them (part 1)

Just got back from a great weekend in Chicago at the Perform Better Summit.  Learned a TON of new stuff, met some great new people and connected with some old friends.  All in all a great time.

View of the Chicago skyline from the Navy Pier


One thing I notice every time I get “out and about” in the fitness world and attend an event like this one – is that kettlebells are RAPIDLY gaining popularity.  Even just three or four years ago, not many folks were training with them … nowadays, almost everyone is using them in their workout programming to some extent.

However, unfortunately, most people still don’t know how do use – or teach others how to use them – CORRECTLY.  Big difference 😉

Maybe it’s that the curve of really learning how to use the ‘bells right is a little too high.  Maybe they are intimidating.  Maybe people are just impatient and don’t want to take the time.  Whatever the case, I am doing my part to put a stop to this 🙂  And that is why I have created this post series.  In it, I’m going to break down for you the top 13 kettlebell training mistakes – and how to fix them!  Enjoy –


Top 13 Kettlebell Training Mistakes and How to Fix Them (part 1)


Mistake #1 – Using too much OR too little weight

A big part of getting started with kettlebell training CORRECTLY is picking the right weight to use.  Go too light, and you’ll get little benefit.  Go too heavy, and your form will be thrown off as well.  Below, you’ll find a full article and video I recently did on what size kettlebell to use:

=> What Size Kettlebell to Use

Mistake #2 – Doing too much, too soon

So you’ve picked up a ‘bell …

ESPECIALLY when you’re first starting out … and during the course of your whole KB training career for that matter … it’s KEY to remember that learning to use KB’s properly is like a skill.  If you don’t take the time to practice and refine your movements before you go after them at full intensity, it’s almost a guarantee that you’ll injure yourself.

Here’s a great article from the archives on the topic of …

=> Why You Need to Practice Your Kettlebell Skills

Mistake #3 – Lack of full hip extension in the swing

The swing is king.  It’s the first kettlebell exericse you should learn (and master) before you move on to anything else.

If you’re making this mistake, you’re not getting a full application of the power that’s being generated by the lower body during the Swing.  Not only will you be weaker, but doing this puts the stress on the wrong muscles and wrong areas of your body.

Here’s an article and video with more info on how to fix this one:

=> Kettlebell Swing Mistakes and Fixes, Part 1

Mistake #4 – The “squat and front raise” swing

This mistake involves a Squat and Front Raise Pattern – vs. the correct ‘hip-driven’ Swing where the arms account for maybe 10-20% of the movement.

Here’s an article that breaks down how to fix this one:

 => Kettlebell Swing Mistakes and Fixes, Part 2

Mistake #5 – Not getting the ‘bell far enough back in the swing

The Swing mistake here is not getting the ‘bell far enough back as the weight comes down between the legs and is ‘hike passed’ back.  Here’s the problem broken down in more detail for you, and how to fix it:

=> Kettlebell Swing Mistakes and Fixes, Part 3

Whew!  Okay … we’re up to kettlebell mistake number five … and we still got seven to go!!  Focus on getting those first five points down, and I’ll be back with part two very soon – we’ll talk about Turkish get ups, cleans, presses, and much more.

’till next time –

Forest Vance, MS, RKC II

PS – If you enjoyed this article, be sure to sign up for my email newsletter and grab your FREE Beginner’s Guide to Kettlebell Training!  Just drop your best email address into the box at the upper right of the page to get it now.

And – if you know someone who might enjoy this info – please don’t hesitate to pass it along :)

Kettlebell Swing Modifications

Recently, I met a doctor here in the Sacramento area who, in addition to his medical practice, owns a weight loss clinic.  He has two BodPods at his clinic – a pretty rare, and super expensive body composition measurement device.

We got to talking, and when I mentioned how I had always wanted to get my BF% measured with one of these devices, he offered to do a test for me.  It was a great experience – and very helpful in the big picture of reaching my ultimate fitness goal(s).

(If you are in the Sac area, I would highly recommend hopping over to his clinic and getting this test done.  I’ll send out more details about exactly how you can set this up, in the next week or so.)

Good news is, I have lost some body fat since the beginning of the year. But I am still about two or three pounds away from my “fighting weight”. So, I need to keep focusing on fat loss … which in my world, means I need to keep doing lots of kettlebell swings 🙂

High volume swing workouts – like the ones in this program – are typically the approach I take to using kettlebells for fat loss.  But when you’re doing hundreds of swings in a single workout, you need to know how to “manage fatigue”.  Which is what today’s video is all about.

Check out the video below, then read the recap below it:

Video Recap

Hey guys, Forest Vance here from FVT Boot Camp in Sacramento, CA. One of the staple exercises in our boot camp program is the kettlebell swing. What we do many times, for a variety of different reasons, if we have people that are just starting off and getting going … if it’s towards the end of a workout we always value safety and want to make sure that people are using good form through the end so we use this when you’re getting smoked out and your form starts to deteriorate. We have a couple different modifications on the kettlebell swing that I want to share with you and break down in this video.

Two very basic ones. The standard two hand kettlebell swing. The kettlebell is coming to about shoulder level and that is what our standard swing looks like. Now if you start to fatigue and get smoked out, let’s say you are doing 100 reps, let’s say your form is not quite on point yet and you’re just getting tired and you know you are breaking down … instead of trying to keep going and getting sloppy go to a half swing. You’re just going to think, snap the hips and let the ‘bell swing up about halfway. That’s your variation number one.

Variation number two is you can switch to a sumo dead lift and you can practice a hip hinge. So you’re swinging away and you get to rep 30 and start getting smoked out I can switch to your half swing … now I’m getting smoked … now I switch to my dead lift. Then I can keep going, I can finish my set and keep getting a workout and I can continue on and practice my skills and drills and get into great shape and keep doing the workout you want to do.

In summary – if you’re just getting started with the kettlebell swing, or if you’re doing high rep/volume swing workouts and need to “manage” your fatigue, this video will help you.  Incorporate these techniques into your training today for better results!

That’s it for now – train hard, and talk soon –

Forest Vance, MS, RKC II

PS – If you liked this article, be sure to sign up for my kettlebell training email newsletter … you’ll get tips and tricks like the ones in this article sent to you several times each week when you do … PLUS a free copy of my Beginner’s Guide to Kettlebell Training!  Just drop your best email address into the box at the upper right of the page to get signed up now.

AND – if you know anyone else who might benefit from this info, feel free to pass it on 🙂

Safe and Effective Kettlebell Training (#1 secret)

I returned home late on Sunday night from my weekend San Jose RKC assistant duties, and I was right back at it Monday morning, teaching a kettlebell boot camp at my Sacramento, CA training studio.

After about 30 hours of learning and teaching kettlebells over the weekend – with some incredibly great and smart folks – I noticed that my boot campers were actually pretty darn dailed in with their swing form. Nice! Good job Forest! 🙂

So, on my drive home from work last night, I started thinking a bit about WHY this is so.  I mean, go into some workout rooms full of people swinging kettlebells, and instead of impressive, things look ugly.  Real ugly.

One reason that our campers look good in the kettlebell form department is simple – we care. We want people to do things RIGHT, and we coach them up until they get it. We don’t tollerate sloppy form.

However, I believe the single most important factor contributing to good kettlebell training form is effective cuing.

This is actually a somewhat complex topic, and can be broken down into all different specific components (visual, auditory, kinesthetic, etc.) … but at its core, is all about matching your teaching style to a student’s learning style.  It is part science and part art.

What I wanted to do in today’s post was simply break down a few of my favorite cues I have learned over the years. These will help you immensely if 1) you are a trainer yourself, or 2) you are training on your own and are having a hard time mastering the technique of a specific KB exercise.

I have also tried to include WHERE I got these cues … because I want to give credit where it is due!


5 Cues for Safe and Effective Kettlebell Training


1 – Punch your butt through a piece of glass behind you

This one comes from the book Kettlebells for Dummies by Sarah Lurie.

It’s a great one if you are having a hard time getting down the hip hinging movement that is the foundation of the kettlebell swing.

As you decend into the deadlift, punch your hips back like you are pushing them through a piece of glass behind you.

I go through a little breakdown of this in a recent video – check it out here:

=> HardStyle Kettlebell Swing Progression (part 1)


2 – Don’t be the guy at the beach

Got this one from David Whitley (the Iron Tamer).

This applies when you are doing a Turkish Get Up – to your bottom shoulder.

A lot of folks make the mistake of letting themselves slouch to the ground with their bottom (closest to the ground) shoulder during the movement.  Hence, you look like the “guy at the beach”.  Do NOT do this.

Instead, push yourself away from your shoulder, and create as much space from your shoulder to your ear as you can. This is a good cue to get you to do that.


3 – Just the right amount of power on the clean

This one comes from the Dragon Door forum, I think … honestly can’t remember.  Sorry to whoever I learned it from 🙂

If you are doing a KB clean, and you give it too much hip snap, the kettlebell will fly up and whack you in the wrist.

If you don’t give it enough power, the move essentially turns into a cheat curl.  Not what we are going for either.

Get it just right, and the movement is a thing of beauty.

Check out this video for a more detailed explanation:

=> How to Fix Your Kettlebell Clean


4 – Throw the kettlebell through your stomach

I am not sure where I got this one to be honest … it was from an RKC though, and maybe on a YouTube video somewhere … thanks again 😉 …

Anyway, it is great to get the proper path of the kettlebell going from the top of the snatch, down to the finish.  Just imagine your are throwing the ‘bell back through your stomach, as it comes out of the top locked out position.


5 – Rip the handles of the kettlebell apart – while keeping your arms straight

This is a great one to help you get your shoulders back in the two handed deadlift and swing movement.  Got this one from Pavel at my first RKC.

When you are at the top of a deadlift position, keep your arms straight, and imagine like you are ripping the handles of the kettlebell apart.  This will fire your lats and force your shoulders down.


Okay! There are five of my favorite coaching cues for you. Use these cues to improve your own form and that of those that you coach.  And watch your progress go through the roof!

Thanks for reading, and talk soon –

Forest Vance, MS, RKC II


PS – I got a killer new package of kettlebell boot camp workouts I’m putting together for you, and it’ll be available this weekend at a great discount.  Keep an eye on your email inbox for details …

PPS – If you want to learn more coaching cues like these, I recommend you attend an RKC event yourself. There is nothing like it. Click here for a list of all upcoming Dragon Door workshops:

=> Upcoming RKC Events

Sacramento, CA Kettlebell Workshop @ FVT

I’m going to do a recap and “top 10 take-aways” list from last Saturday’s Sacramento Kettlebell Workshop here in just a sec … but first, have a quick look at this footage –

I got “challenged” to do one of my kettlebell combos with my biggest KB – and my wife caught it on film! Check it out:


Okay, enough of that 😉 –

Every time we hold a kettlebell workshop at the studio, it gets a little bit better … and I think Saturday’s event was no exception.

This time around, we had folks come in from over 100 miles away – which was a first! – we made it a two-session, optional full – day (five hour) event, which was also a first – and most importantly, I think it was the most fun I’ve ever had teaching one of these.  So thanks again to all who attended.

There were so many things that I ended up covering, that I wanted to share with those of you at home who couldn’t make it out –

So, I thought I would put together a quick list of the top 10 highlights of the day, based on initial feedback –


1 – Kettlebell footwear tips

One important point I covered was what kind of footwear to use when you’re training with kettlebells.

I covered this topic in depth in a post on this blog some time back; if you missed it, check it out again here:

=> 5 Reasons Why You Should Train Barefoot


2 – What size kettlebell to use

This is something I haven’t covered at previous workshops, but realized that it was an important thing a lot of beginner KB users are struggling with. Check out this video to for some tips:

=> What size kettlebell to use (video)


3 – History of the kettlebell

I added a fun little intro piece about the history of the kettlebell, and folks told me that they enjoyed it. Here is some info for you, from Wikipedia:

=> History of the kettlebell


4 – Simple warm up

A simple kettlebell warm up that you can use any time, to get ready for a great KB workout:

  • KB sumo deadlift – 8 reps
  • KB halo – 8 each way
  • ‘pumps’
  • repeat 2-3 times total

This warm up, by the way, is from Enter the Kettlebell by Pavel:

=> Get Enter the Kettlebell


5 – Box squat/vertical jump/towel swing progression

A couple of drills, that are great to help you learn the fundamentals of the kettlebell swing.

First is the box squat – practicing sitting back on to a box/bench/etc. – and learning how to move through the hips.

Then, you progress to the same movement, but jump out of the bottom – to simulate the explosiveness of a swing.

Finally, the towel swing is done with a towel inside the handle of the KB – this is a separate drill, but it teaches you to use your lower body, in the way that you learned to in the box squat progression – and then you can put everything together and improve your swing technique!

(This one came from Enter the Kettlebell as well.)


6 – Simple three step TGU progression

This is the Turkish Get Up, broken down into its simplest steps.

  • The pick up – roll to the side, pick the KB up off the floor
  • The 1/2 get up – the movement performed up to the hip bridge position
  • The full get up – the movement performed to the full standing position

Here is an article and video breaking down the full Turkish Get Up progression for you:

=> How to do the Turkish Get Up


7 – Pull up progression

I covered some tips to help you do more pull ups – which are an amazing complimentary move to your kettlebell training. You can find some great pull up tips in these two articles:

=> How to do more pull ups fast
=> “Controlled cheating” for more pull ups


8 – KB clean tip(s)

The technique tip on the kettlebell clean that I think helped everyone the most was to use less hip snap than you would in a swing.

See this tip broken down in more detail in this video:

=> Kettlebell clean tips


9 – Power breathing

We did a series of really cool power breathing drills, and a lot of folks ended up setting pressing PR’s.

See these covered in more detail in The Naked Warrior by Pavel:

=> The Naked Warrior by Pavel


10 – Swing => high pull => snatch progression

This progression seemed to help attendees get the feel for the snatch exercise the most.  It is broken down into detail in this post/video series:

=> Learn the KB snatch


All in all, it was an awesome day. I had a ton of fun teaching it, and want to say thanks again to everyone who made it out.

If you missed this workshop, I hope to see you at the next one! And, in the meantime, don’t forget – the next best thing is to grab one of my “flagship” programs, here:

=> The Kettlebell Basics Swing Manual
=> The 10×10 Kettlebell Solution


Thanks again for reading, and talk soon –

Forest Vance, MS, RKC II