CRAZY KB Swing – Burpee Bonanza Workout (video)

This workout is ridiculous.

We did it in my boot camp this last week, and every one hated it (but loved it at the same time.)

You’ll hate it too – but you’ll burn a lot of kcals in the process, and you’ll feel great when you’re done.

You have been warned. Now try it at your own risk …


(NOTE:  In the video below, I grabbed a quick video of me going through segment 2.  You could do this segment as a “finisher” sort of thing at the end of your regular routine … or do it as part of the full workout as described below.)


CRAZY KB Swing – Burpee Bonanza Workout


Workout Recap 

(segment one)

  • 12 body weight inverted rows
  • 12 push ups with a rotation (total)
  • 8 KB presses/side
  • 8 KB rows/side

Do this circuit three times with as little rest between exercises as possible.

(segment 2)

Then, do as many reps as possible, with perfect form, of the following exercises in :40 intervals each. Take no rest between moves:

  • KB sumo deadlift
  • squat thrust
  • two hand KB swing
  • burpee, no push up
  • one hand kb swing (:20 per side)
  • burpee with push up
  • hand to hand KB swing
  • burpee with two push ups

Repeat this circuit three times.

(segment 3)

THEN, set up two cones, ten yards apart. Run back and forth between the cones for :30 as many times as you can. Rest for :30. Repeat five times, trying to maintain or beat your pace from set one.


Enjoy that one – IF you make it through 😉

And – if you like it – it’s a sample from my Weekly Kettlebell Workouts program, on sale this weekend – get more details HERE.

Train hard, and talk soon –

Forest


Labor Day Weekend Special + Free KB/BW “Flipped” Workout

When this gets posted, I will be in the midst of – if I do say so myself 😉 – a well-deserved end-of-summer break!

I shot a couple of videos and wrote up a few workouts for you ahead of time though – so you’d be well taken care of in my absence 🙂

In today’s post, I have news of a Labor Day Weekend Special we’re running, as well as a FREE new KB/BW workout for you to try!


Labor Day Weekend Special

We’re running a special on the FVT Coaching Club – my weekly kettlebell workouts program – for the Labor Day weekend here in the US.

=> Get 12 kettlebell/body weight workouts PLUS No Gym? No Excuse DB Complexes for Fat Loss FREE

In the FVT Coaching Club, you get three new workouts every single week – that’s twelve per month – for less than a dollar per workout.

You’ll get access to some other great bonuses when you sign up, including my exclusive ’13 Kettlebell Training Mistakes and How to Fix Them’ report and video series.

Plus, this weekend ONLY, you get a FREE copy of my No Gym? No Excuse! DB Complexes for Fat Loss Program when you try the FVT Coaching Club for at least one month.

It’s a super cheap deal … but since we’ve been getting such awesome feedback about the kettlebell workouts program, I’m more than happy to let you try it out for a month, and incentivize you a bit to do so 🙂

=> Grab this special offer here


Free KB/BW “Flipped” Workout

(Sample from the FVT Coaching Club/weekly kettlebell workouts program)

This one is called “Flipped” because the first pair of exercises, you start at low reps and work up to high … and for the last pair, you start at high reps and work down to low!

Pair 1 – four sets each; keep the weight the same and do 6 reps on the first set, 8 on the second, 10 on the third, and 12 on the last:

1 arm KB press
single leg squat

Pair 2 – three sets of fifteen reps each

1 arm kettlebell swing (15 reps each arm)
push ups

Pair 3 – four sets of each; keep the weight the same, rest as little as possible between sets, and go 12 reps of each, 10 reps of each, 8, and finish with 6

KB goblet step up
inverted row w/ suspension trainer/etc.


That’s it for today! Keep training hard. And don’t forget – if you liked the workout above, it’s a sample of what you’ll get with my weekly FVT kettlebell workouts program – and it’s on sale this weekend. Click HERE to get all the details.

– Forest Vance
MS, CPT, RKC II

Is Your Kettlebell Press Jacked Up? Here’s How to Fix It!

The kettlebell press is an AWESOME move.  It’s fantastic for building upper body strength.  And pressing a heavy object over your head rates right up there with the most “functional”, real-life-applicable exercises you can do.

HOWEVER – it’s also a tricky one to master.  There are a lot more “moving parts” to it, if you will, than you may think.

The problem with the press I cover in today’s video is SUPER common … but fortunately, relatively easy to fix, IF you know how.

Watch today’s video, try the drill for yourself, and see if you don’t improve your KB press!!


*Also … if you find this video helpful … I got a special surprise for you at the end.  If you like the video, you’re going to really dig this.  So don’t miss it 😉


Is Your Kettlebell Press Jacked Up?  Here’s How to Fix It!

(video recap)

Today I’m going to give you a tip that will instantly improve your kettlebell press.

One very common error that people make when they do a press is they don’t keep their forearm straight up and down through the movement. What it should look like is that my elbow is stacked right underneath my hand throughout the whole exercise.

What a lot of people will do is try to rack the ‘bell like this (demonstrates) and they go and do the press and that is not how you want to do it. You’ll be out of alignment and not be in your optimum pressing position.

So a quick fix is something called a bottoms up press.

Clean the ‘bell up and get into your bottoms up position. You’re going to use a lighter ‘bell than usual since it takes a lot of grip strength. Now I can keep my elbow tucked into my side and it will force me to have my elbow underneath my hand.

For this one you want to look at the ‘bell the whole time and use your tension technique and your power breathing. Do a couple presses. Now I’m forced to have my elbow stacked underneath my hand.

Now I’m going to go back and do my regular press and I’ll automatically be in the same exact position and it is going to be much stronger and much more advantageous pressing position.

So if you want to boost your press or if you are having problems getting a hang of the movement try doing that bottoms up press drill. Then you can go back to your regular press and you’ll see an improvement right away.

###

Thanks for reading/watching, train hard, and talk soon –

Forest


PS – Okay for the special surprise 🙂

I’ve recently dug up/refreshed for 2013 one of my “classic” programs from the vault, ‘No Gym? No Excuse! Dumbbell Complexes for Fat Loss’.

It’s a full 12 week program that shows you how to use dumbbell complexes for rapid fat loss and extreme conditioning.   The workouts in it are killer and pretty darn unique, if I do say so myself 😉 …

Thing is, we pulled it off the market about two years ago for various reasons … so I “spruced it up” and updated it for 2013, and now I’m making it available – for FREE – when you try at least one month of my FVT Coaching Club program.

=> Get your FREE Copy of No Gym? No Excuse Dumbbell Complexes for Fat Loss by clicking here

So you’ll get 12 FVT – style KB/BW workouts, PLUS No Gym? No Excuse! DB Complexes for Fat Loss – for less than 10 bucks!  Holy moly!! 😉

(I wasn’t going to announce this offer until Friday, but it’s up and ready to rock, and so for a “special reward” to folks like yourself who’ve read all the way to the end of this post – YOU get first crack at it!!)

 => Grab the deal here

Modified Turkish Get Up (advanced variation)

In the video below, I break down an advanced/modified Turkish get up variation.

This is actually one of my favorite TGU “progressions” … it’s more challenging than the standard version of the exercise, and is a great way to work in the “same but different” programming approach we frequently speak about.

Watch the video to see this cool advanced Turkish get up variation -and to try it out for yourself:

(video recap)

Today I’ve got a cool Turkish get up variation for you.

What we’re going to do here (and I’ll demonstrate in just a second) is a Turkish get up with three presses during the movement.

I’m not exactly sure what this one is called. Some people call it a “three-headed dragon” … which is pretty cool 😉 … so we can call it that if you want.  I’ll just call it a Turkish get up with three presses in the movement.

Start on your side and get set up like you are doing your normal turkish get up. Pull the weight into the frame, press it up. Your first press is going to be from the ground. So right here your elbows are close to the body and your wrist is nice and straight.

Punch up, up to the hands for your second press. Make sure you come all the way down to your rack position and then press it over your head.

Now sweep the foot and come up to our lunge position. Do a press from here. Now stand up and reserve the motion, hitting your presses again on the way down.

That’s your movement! A modified Turkish get up with three presses.  Enjoy!

Beginner/Intermediate Kettlebell Swing Form Tip + ‘Quick Fix’ (video)

In the video below, I cover a common kettlebell swing form mistake.

This mistake is typically made by beginner and intermediate KB trainees – but you might even be doing it if you’re “more advanced”.

It’s actually the cause of many unnecessary problems that CAN stem from the KB swing – but SHOULDN’T – including lower back pain.

Watch the video below to see what it is – and your ‘quick fix’ for it:


Beginner/Intermediate Kettlebell Swing Form Tip + ‘Quick Fix’

Thanks for watching, and talk soon –

Forest

PS – Having trouble viewing the video in your browser?  Click the link below:

=> Kettlebell Swing Form video

(Video Recap)

I’ve got a quick tip for you today to improve your kettlebell swing form. 

This is a fix to a mistake that I see all the time in our kettlebell boot camps and with my personal training clients.

First, let me show you what a proper kettlebell swing should look like. 

You can see that I’m swinging the ‘bell back and it is coming above my knee level. What you want to avoid is swinging the weight too low to the ground and going below the knees. 

I get the ‘bell tight to the frame and as close to my body as I can. Get the hips out of the way at the last minute. 

You only make the mistake once of swinging it too high and hitting yourself 🙂

This will make for a much tighter arc and makes for more efficient movement. It’ll also take the pressure off your lower back which is probably the #1 cause of back pain when doing kettlebell swings…….which you shouldn’t be getting, by the way!

“KB’s For Fat Loss” Offer + Double Kettlebell Workout

Got a little special offer for ‘ya this weekend!

You can get a copy of my Easiest, Fastest Fat Loss Meal Plan Ever for FREE (a $17 value) when you grab a copy of the new-and-improved-for-2013 Kettlebell Basics Quick Start Guide.

=> Get your KB’s for Fat Loss Special here

ALSO … while I got ‘ya here 😉 … continuing with yesterday’s “theme” of double kettlebell training … I got a sample double kettlebell workout for you from the Kettlebell Basics Quick Start Guide:


Double KB Circuit

This workout is going to be performed for time:

:30 – double clean and presses
:30 – active rest (jump rope, jog, etc.)

Repeat 4 times

:30 – Kettlebell Squats
:30 – Active Rest

Repeat 4 times

:30 – Double Kettlebell Swings
:30 – Active Rest

Repeat 4 times


You’re allowed to take :60 seconds between rounds on this one. Make sure to pick a heavy weight for all these exercises; you’re only working for :30 so you won’t get a lot of reps.

This is a great one for just building up that “base strength” that everyone needs so much.

K, that’s it for today!  Have a great weekend, get some double kettlebell work in, and talk soon –

Forest Vance, MS, RKC II


How to Master the Kettlebell Snatch (part 2)

For the last couple of days, we’ve been talking about how to master the kettlebell snatch.

If you missed yesterday’s article, check that out by clicking the link below – you’ll learn about the three main elements of the KB snatch exercise:

=> How to Master the Kettlebell Snatch

Also, for a complete breakdown of how to do the KB snatch, with written, picture, and video instruction – plus the same for all the other basic kettlebell moves, and LOTS more – take a peek at my original best-selling KettlebellBasics.net Quick Start Guide, new and improved for 2013:

=> NEW for 2013 Kettlebell Basics Quick Start Guide (low price for a limited time)

Now.  For you today, I have a three video series on mastering the kettlebell snatch.  I cover many of the same points I did in yesterday’s article – but the video medium is great to really solidify what you’ve learned so far and to help make sure you’ve got all the fine points of the movement down.  Check it out:

Mastering the KB Snatch – Video 1

Mastering the KB Snatch – Video 2

Mastering the KB Snatch – Video 3

The kettlebell snatch is a tricky exercise to master, but it’s well worth taking the time to learn it – you’ll get some great benefits by incorporating it into your routine.  Use the three video series in this post to help you improve your form!

And, if you enjoyed these videos, don’t forget to check out the new-and-improved-for-2013 KettlebellBasics.net Quick Start Guide – in it, you’ll find full written, picture, and video instruction on the snatch as well as all the other basic kettlebell moves – and LOTS more. It’s on sale for a very low price for a short time – click the link below to check it out:

=> 2013 Kettlebell Basics Quick Start (on sale now)

Thanks for reading, train hard, and talk soon –

Forest

How to Master the Kettlebell Snatch

Thanks again SO much for the great feedback on yesterday’s request.  I will be working hard in the coming days and weeks to cover the topics you want to know more about and help you get the results you desire!

One of the top requested topics was how to perform the kettlebell snatch correctly.  So, that is the topic of today’s article.  I hope it helps –
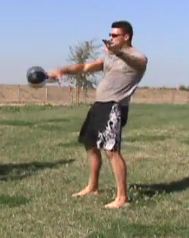
 

Mastering the Kettlebell Snatch

The snatch is one of the best exercises around for building world-class conditioning with kettlebells. However, learning and mastering proper technique in this exercise can be very tricky.

By breaking the movement down into three steps, we can drastically cut the learning curve and help you learn how to do the movement efficiently and effectively in as fast a time as humanly possible!


Here are the three main elements of mastering the kettlebell snatch:

1. The Lockout

You’ll start with a kettlebell between the feet in a sumo deadlift position. Cheat curl the ‘bell up to your shoulder and press it up over your head.  All we’re trying to do is get comfortable with our overhead lockout position.

The bicep should be right by the ear. A common mistake is to hold the ‘bell slightly in front of the body. If you lack proper shoulder mobility, this is likely going to be a problem for you (all the more reason to practice your Turkish getups).

A great drill to practice and get comfortable in this lockout position is an overhead walk. To perform this drill, you would simply get the KB pressed over your head and walk around the room with it. If your elbow is bent, or the kettlebell is out in front of you too far, this is nearly impossible – and that this drill is very self-correcting is part of the beauty of it.


For a complete breakdown of how to do the kettlebell snatch – with pictures, video illustration, etc. – check out the new-and-improved-for-2013 KettlebellBasics.net Quick Start Guide HERE


2. The Downswing

To start the downswing phase of the snatch, from your overhead lockout position, think about closing the distance from the elbow to the rib cage as fast as possible to bring the kettlebell down.

The arc of the snatch is much closer to the body than the arc of the swing.

Another good coaching point for this part of the snatch is to think about throwing the kettlebell through the stomach.

If you were to take a snapshot of the kettlebell at the bottom position, it would look identical a one arm swing (another reason why it’s so important that you master the HardStyle swing before moving on to more advanced drills like the snatch).


3. The Upswing

We’ve now progressed to performing a full kettlebell snatch. We’ll start with the ‘bell about one foot in front of us (the same set up as a swing).

To start the move, hike pass the weight back – again, the same ‘start’ as the swing. But, instead of swinging the weight in front of you and up to shoulder height, we’re going to go straight overhead with the move into a snatch.


Remember:

The arc of snatch is much closer to the body than the swing. And so to drill this idea down, we’ll perform the following progression:

  • Three one-hand swings.
  • Three high pulls – try to make the ‘bell ‘float’ at the top by pulling the elbow back and snapping the hips simultaneously.
  • Three snatches. The snatch will simply be an extension of the high pull. The weight floats at the top during the high pull, and then we get our hand around the ‘bell to finish the snatch.

In summary, the kettlebell snatch is a somewhat difficult exercise to master technique-wise, but it’s well worth it considering the benefits it provides. Use the three steps outlined in this article to fast track your learning curve in learning the kettlebell snatch!

Train hard, and talk soon –

Forest Vance, MS, RKC II

PS – For a complete breakdown of how to do the kettlebell snatch – with pictures, video illustration, etc. – check out the new-and-improved-for-2013 KettlebellBasics.net Quick Start Guide HERE
 

Upper Body Kettlebell “Drop Set”

Hey –

Just got done with a great boot camp workout this morning, and finished it with a killer upper body kettlebell “drop set”. I wrote it up for you (and shot a video) – try it out yourself, and let me know how you do:

###

This one you can do as a stand-alone workout in which case you’re going to want to do about three to four rotations of it. Or you can do it as a finisher at the end of an upper body workout (or even a full body workout) and you’ll do one or two rotations.

It’s a great one for your grip, shoulder strength, for working your kettlebell technique and a bunch of other stuff!

First, get a kettlebell that you can press over your head about eight to ten times. One of the keys to this workout is that you have to pick a proper weight. If you pick a weight that is too low it’ll be too easy but if it is too heavy your form is going to go out the window.

Start with six military presses from the shoulder. Make sure you hit a couple checkpoints. Your forearm is straight up and down and your elbow is right underneath the hand. Do your press and finish with the ‘bell straight up over your head.

Do six of those. On the sixth rep you’re going to press the weight up and lock it overhead. You’re going to do a 25 to 50 yard walk. If you’re outside you can go to a soccer field or to the park. If you’re in the gym you can walk around in a big circle.


Click HERE now to see the video AND to get more workouts like the one in today’s article!


Now without setting the kettlebell down, when you’re finished with your 25-50 yard walk, go down to your rack position. You’re going to do eight rack squats.

Then you’re going to do another 25-50 yard walk in the rack position with the same arm.

When you’re done with that take a staggered stance and go down to a kettlebell row. In this version try to keep your hand off the leg. Do ten rows.

When you’re finished with that do a 25-50 yard one arm farmer’s walk. Set the ‘bell down, shake the arm out…you’ll be pretty smoked by then!

Now do the same thing on the other side.

If you’re doing this as a finisher do one or two rounds. Or you can do it as a stand-alone upper body workout for three to four rounds total.

I hope you like that workout! Try it yourself…I know you’re going to love it 🙂


Train hard, and talk soon –

Forest

PS – To see a video demo of the above workout, click HERE. You’ll also learn about how you can get three new workouts like the one above every week. Thanks!