The special pricing for my Zero-to-20 Pull Up Plan ended last night, but I wanted to share something valuable with you regardless.
Here’s a simple test: Can you hang from a pull-up bar for 30 seconds with good form?
If not, you’re not ready for full pull-ups yet. And that’s totally fine!
Try this instead:
Week 1-2: Focus on dead hangs. Work up to 30 seconds.
Week 3-4: Add slow negatives (jump up, lower down slowly over 5-8 seconds)
Week 5-6: Try assisted pull-ups (small jump to help)
This foundation work isn’t “cheating” – it’s smart training that prevents injury and builds real strength.
Most people skip this and wonder why they never progress. Don’t be most people.
By the way, my “Operation Pull Up” Zero-to-20 Pull Up Plan is still available if you want the complete system with all 6 tracks, video demonstrations, and exact progressions.
Want to know one of the most significant differences between someone who masters their first pull-ups at age 40+ versus someone who struggles for years?
Recovery.
Your 25-year-old self could bang out pull-up attempts daily and recover overnight. Your 40+ self needs a more innovative approach.
Here’s the “cheat code”:
Example from Track 1 (Beginner – 0 Pull-Ups):
-> Click here to check out the full “Operation Pull Up” Zero-to-20 Pull Up Plan
Day 1: Hollow holds + Ring rows + Assisted pull-ups
Day 2: Bar hangs + Slow negatives + Flexed-arm holds
Day 3: Self-assisted pull-ups + Progression work
Then you rest and repeat the cycle.
Notice the pattern? Each day targets different movement patterns and energy systems. You’re not just “doing pull-ups” – you’re building:
-> Core stability (hollow holds)
-> Grip strength (bar hangs)
-> Eccentric control (negatives)
-> Full range strength (assisted reps)
(This is just one example from the beginner track – each of the 6 tracks has completely different progressions based on your current ability level.)
When you respect your body’s recovery needs and train the RIGHT movement patterns for YOUR level, you progress FASTER than the young guys grinding random pull-up attempts every day.
Inside Operation Pull Up, every single workout is mapped out with this recovery principle built in. Each exercise, each rep count, each rest period – all designed specifically for 40+ individuals at every skill level.
Plus, you get the Kettlebell Tabata bonus that burns fat 38% faster in just 20 minutes. Still on “stand-alone launch” pricing for everything. Grab your copy here:
I’ve watched hundreds of people over 40 struggle with pull-ups.
Most make one (or two, or all) of the same 3 mistakes:
Mistake #1: Starting too aggressive
They jump straight to full pull-ups instead of building the foundation. Result? Shoulder pain and zero progress.
Mistake #2: Ignoring grip strength
Your grip gives out before your back muscles. You’re not weak – your grip just isn’t ready.
Mistake #3: Random workouts
They do pull-ups “whenever” instead of following a progressive system. Consistency beats intensity every time.
— Here’s what actually works instead (BTW – this is just a preview – the full program has complete day-by-day breakdowns, exact rep schemes, video demonstrations, form cues, and much more detail for every single exercise):
Track 1: Beginner (0 Pull-Ups) Day 1: Hollow holds, ring rows, assisted pull-ups Day 2: Bar hangs, slow negatives, flexed-arm holds Day 3: Self-assisted pull-ups with progression
Track 4-6: Advanced to Master High-volume ladders up to 55+ total reps Heavy weighted pull-ups for strength
#
In the Operation Pull Up Zero-to-20 Pull Up Plan, you start where YOU are. Each track has specific daily workouts – hollow holds, negatives, flexed-arm hangs, ring rows – all designed to build the exact strength patterns you need. This is the systematic approach that’s helped 203+ people over 40 finally achieve their pull-up goals. And it’s still available at stand-alone launch pricing at the link below:
The program is still available, but no longer at the launch price.
Is it still worth it? Absolutely.
Here’s why – and a technique tip you can use today:
#
Over-50 KB Breathing & Bracing
Before any kettlebell movement, think about being able to take a decent punch to various parts of your body while still being able to talk and breathe.
Take a big breath with an active diaphragm (not a big belly breath), then let your diaphragm contract isometrically along with your trunk muscles. This creates a stable torso “shield.”
You can either hold this brace or breathe behind it – your diaphragm moves, but you’re not trying to create that big belly breath. The key is using just enough tension to make the lift safely, not so much that you’re focused on the bracing instead of the movement.
Most people over 50 either don’t brace at all or over-brace and can’t move properly. This technique gives you the stability you need while keeping you functional.
#
The program hasn’t changed. The results haven’t changed. Just the investment.
Time is running out to get “The Kettlebell Revolution for People Over 50” at the original pricing.
Since this is your last chance, let me remind you exactly what you’re getting:
✓ Complete kettlebell system designed for men and women 50+ ✓ Proper progression that won’t wreck your joints ✓ Recovery protocols that actually work at our age ✓ Real-world schedules (not 2-hour gym sessions) ✓ Safety modifications for common 50+ issues
Got this review from B. Owens (busy business owner):
“Who cares about strength, we just wanna be lean-ish and look respectable right? Well, Forest has showed me that getting stronger is the ultimate fitness ‘hack.’ Build muscle and it’s amazing how neatly everything else – fat loss, etc – falls into place. As a busy business owner, I appreciate the efficiency of his approach and workouts. I’ve never gained strength this fast in my life and I’ve also lost weight to boot.”
That’s what happens when you use a program designed specifically for people our age.
Here’s a sample workout from the program:
PART 1 – 4 rounds total:
½ or full Turkish Get Up (40 seconds) – “in between” option = ¾ get up
Rest 15 seconds
KB deadlift or KB swing (30 seconds) – “in between” option = ½ swing
Rest 15 seconds
PART 2 – 4 rounds total:
Bodyweight split squat or KB rack split squat (40 seconds per side)
Rest 15 seconds
Single arm KB row (40 seconds per side)
Rest 15 seconds
FINISHER – Perform 4 single OR double KB “total body attack” at the top of each minute. Repeat 5 times for 5 minutes total (20 reps).
Notice the progression options? That’s the difference between a program FOR people 50+ vs. generic fitness.
What is the biggest mistake I see people over 50 make with kettlebells?
They try to train like they’re 25.
Here’s what I mean:
At 25, you could do back-to-back high-intensity workouts and bounce back overnight. Your joints could handle whatever you threw at them.
At 50+? Your body needs a completely different approach:
Recovery: You can work out every other day, but be smart about it. Push hard with your kettlebell strength work, then alternate with conditioning or mobility days. Don’t go heavy every single session.
Joint prep: Always start with something specific to get you ready for the work ahead. If you’re doing swings and hinges, prep those movement patterns. Heavy upper body day? Make sure your shoulders are warmed up first.
Progression: Start with appropriate progressions for YOUR current fitness level, then slowly work up. Your connective tissue needs time to adapt – rushing this is where injuries happen.
Movement quality: Perfect form beats sloppy every time. I’d rather see you do fewer reps with great technique than high volume with bad form. You’ll get more results AND reduce injury risk.
You see, most kettlebell programs are designed by 30-something trainers who think “harder = better.” But I created this program to works WITH your body, not against it.
Quick story for you today and a warm-up you can steal.
Over the last 30 years, I’ve done a lot of things that’ve beaten my shoulders up—15 years of contact sports, 30+ years of lifting weights, and a good chunk of time in the last decade doing everything from grueling Kettlebell cert weekends to Spartan races to powerlifting comps.
One of the turning points was about five years ago, when I tore my pec and had to get surgery. That rehab process left me hesitant to do a lot of the things I used to love—heavy kettlebell pressing, snatches, barbell benching. And it became really clear: what had always worked before, wasn’t working anymore.
So I went back to the drawing board. I already had my Master’s in Human Movement with a post-rehab focus. I’d dabbled in yoga during my football days. But I really dove back into that world—corrective exercise, movement prep, mobility work—and never looked back.
I even completed my 200-hour yoga teacher training last year to deepen my understanding and sharpen my own practice.
It’s a 28-day plan, and it’s honestly just a really solid, structured shoulder-focused daily stretch, mobility, and strengthening program that helps you build healthier, more mobile, pain-free shoulders over time.
I actually did this exact protocol leading up to a weeklong yoga training earlier this year. I thought I’d be the stiffest guy in the room, especially in my shoulders and thoracic spine. But after doing this daily for a month beforehand… I held my own.
Same thing after pec rehab. Once I was cleared, I used these movements to rebuild my strength. Eventually, I got back to pressing and benching what I was doing before the tear—and even entered a powerlifting meet last year.
Here’s a 5–7 Minute Shoulder Warm-Up I’d recommend before kettlebell pressing, barbell benching, snatching, or overhead work:
Wall Slides – 1×10 Opens up the thoracic spine and activates upward rotation.
Band Pull-Aparts – 2×15 Fires up the posterior shoulder and mid-back.
Bottoms-Up KB Carry – 2×20 yards per arm Great for rotator cuff activation and shoulder stability.
Kettlebell Halos – 2×8 each direction Mobilizes the joint and preps for multi-plane motion.
Dead Hangs – 2×15-30 seconds (if shoulders allow) Opens up the shoulders, builds grip and stability.
Arm Bar or Open Book Stretch – 30 seconds/side Releases the anterior shoulder and improves thoracic rotation.
Optional: Add light Turkish Get-Ups (1-2 reps per side) if you want to integrate everything.
Try that before your next pressing workout. You’ll feel the difference. And if you want a full 28-day plan with follow-along videos and PDFs to guide you through it—check out the 8-Minute Shoulder Fix here:
The special launch price is ending, but it’s still an absolute steal for what you get. And after today, this’ll be the last time I’ll be talking about it for a while.
So if you’ve got shoulder issues—or you want to avoid them—this is a great place to start.
Peace out, and have a great day!
— Forest Vance, MS Certified Corrective Exercise Specialist 200-Hour RYT Former Pro Football Player KettlebellBasics.net
If you’re anything like me—and most of the people I coach who are 40 and up—you’ve probably dealt with some nagging shoulder pain. Maybe you’ve even had to skip pressing movements, kettlebell snatches, or push-ups because of it.
Over 40% of all resistance training injuries involve the shoulder. That makes it the most commonly injured area in the gym.
And that stat only includes people who went to the doctor.
If you’ve got a low-grade shoulder ache and you’re just pushing through it, you might be heading toward something more serious unless you take steps to fix it.
Don’t just stretch — mobilize. Most people think stretching is the answer. But mobility-focused movement sequences are another key part of creating change in the shoulder joint and surrounding tissue.
Fix your posture. Slouched posture and tight upper traps cause a chain reaction that stresses the shoulders. You’ve got to retrain those postural muscles and open up your upper back.
Improve shoulder stability. This one made a huge difference for me. It’s not just about being flexible — it’s about controlling the shoulder joint under load and in motion.
Keep it simple and consistent. The key is doing something that fits into your life. You don’t need 45 minutes a day. You need a plan you can stick with — and that’s why I made it just 8–10 minutes.
It’s a 28-day program designed for people 40 and up who want to relieve shoulder pain, restore mobility, and train without limitations.
It includes video demos, PDF guides, daily routines, and a progress tracker — plus I’m including my 28-Day Kettlebell Body Revival plan for free this week when you grab your copy.
If you’re serious about training pain-free and staying strong for the long haul, this is the place to start.
Forest Vance, MS Certified Corrective Exercise Specialist KettlebellBasics.net
PS – I dealt with shoulder pain for years. I tried just about everything. What finally worked was putting together a smart, consistent routine like this — and sticking to it. If you’re ready to fix it for good, grab the plan this week while it’s still on sale -> the 8-Minute Shoulder Fix
While shoulder issues can come from a variety of causes, one of the most common culprits I’ve seen—especially in people 40+ who train hard—is tightness in the posterior capsule.
Here’s what’s happening:
The rotator cuff muscles in the rear of your shoulder wrap around the joint and attach to your upper arm. When these muscles get tight, they pull your shoulder forward and down over time.
This leads to chronic tension, poor shoulder mechanics, and a much higher risk of impingement—especially when pressing overhead or even doing bodyweight moves like push-ups.
If this sounds familiar, I’ve got something simple but powerful for you to try:
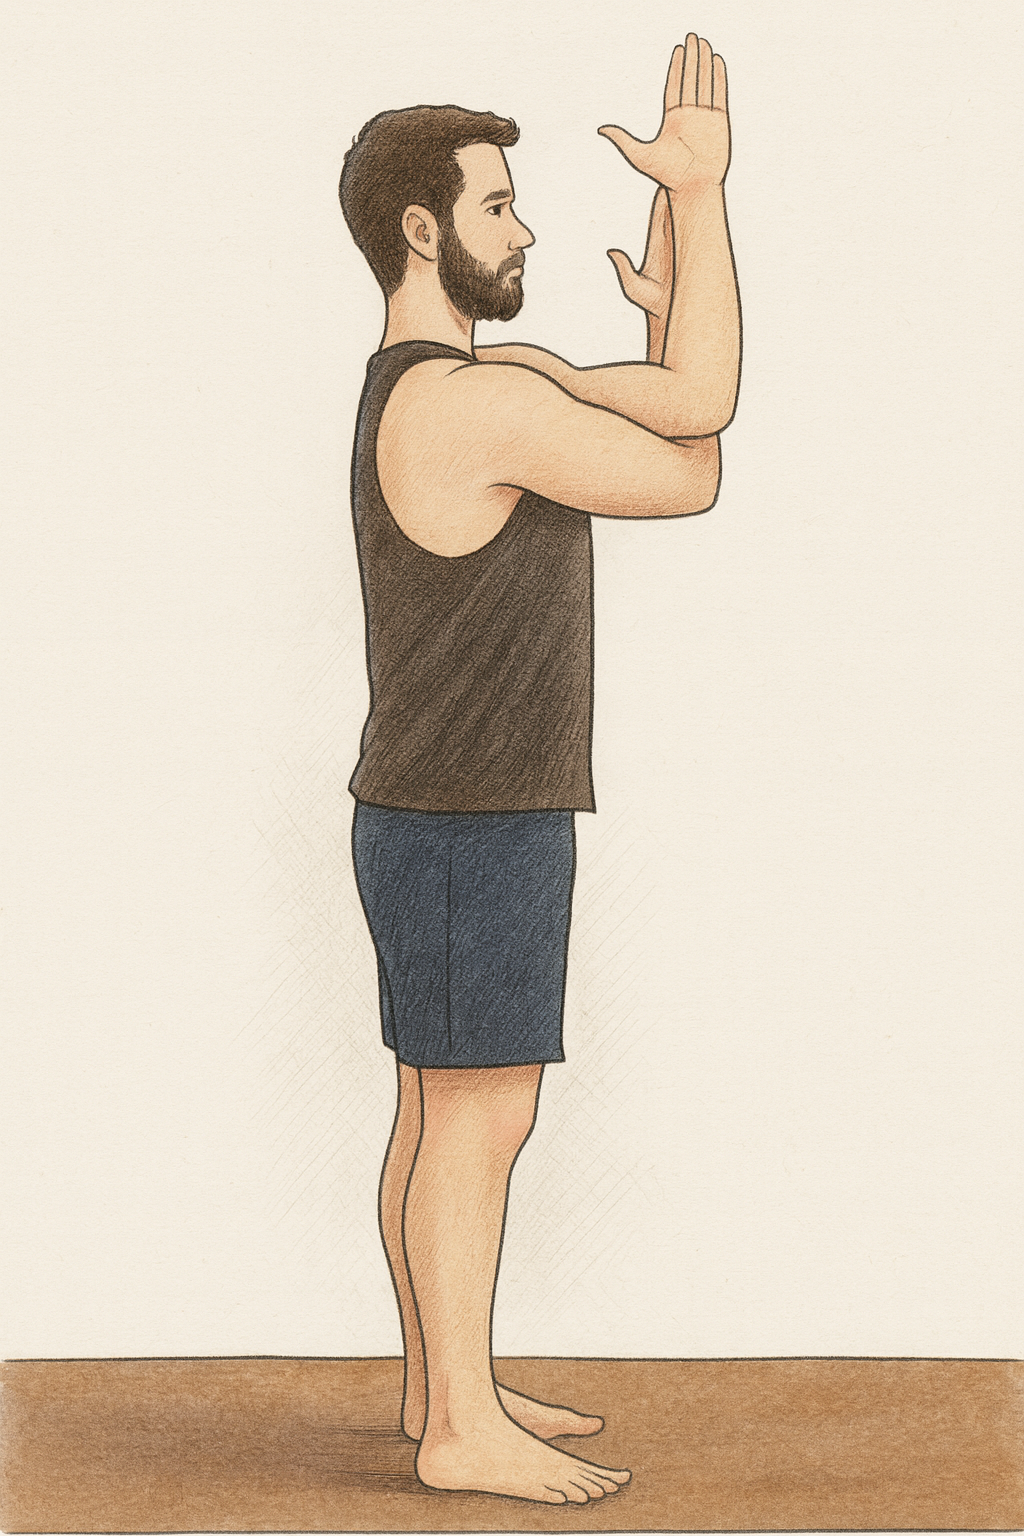
EAGLE ARMS STRETCH
This stretch is one of my go-tos for tight, painful shoulders. Most people haven’t tried it—and it works wonders when done consistently.
Here’s how to do it:
Start in a seated or standing position with your spine tall and shoulders relaxed.
Extend both arms straight in front of you at shoulder height.
Cross your right arm under your left arm at the elbows.
Bend both elbows so your forearms point up.
Try to wrap your forearms around each other and bring your palms to touch (or the backs of your hands, if your palms won’t touch).
Lift your elbows slightly so they’re in line with your shoulders.
Draw your forearms away from your face while keeping your shoulders down.
Breathe deeply and hold for 20–30 seconds. Repeat on the other side.
Modifications:
Chair Support: You can do this seated in a chair with your back supported for more stability.
Beginner Option: If a full wrap isn’t available, cross the arms and press the backs of your hands together or grab opposite shoulders.
#
If your shoulders are feeling tight, sore, or unstable—I highly recommend incorporating this stretch into your routine for the next two weeks and seeing how you feel.
And if you want a complete, step-by-step system to relieve pain, restore mobility, and bulletproof your shoulders?
– Forest Vance Master of Science, Human Movement Certified Corrective Exercise Specialist
PS – This isn’t physical therapy, and it’s not yoga class. It’s a fast, effective mobility + strength solution for men and women 40+ who want to move better and keep training hard without breaking down.